Instalación de GeoNode
Requisitos Mínimos
- SO: Ubuntu 18.04
- RAM: 6 GB
- Dominio: ejemplo.com
Componentes
- Servidor GeoNode v2.10.x
- PostgreSQL
- nginx
- GeoSafe
- Risk Tools
- Java 8
Servidor GeoNode
Proceso de instalación del servidor GeoNode
Instalación de dependencias
Paquetes usados para GeoNode Core,
sudo apt update
sudo apt-get install -y python-gdal gdal-bin \
                        python-paver python-pip python-dev python-virtualenv virtualenvwrapper \
                        libxml2 libxml2-dev gettext \
                        libxslt1-dev libjpeg-dev libpng-dev libpq-dev libgdal-dev libgdal20 \
                        software-properties-common build-essential \
                        git unzip gcc zlib1g-dev libgeos-dev libproj-dev \
                        sqlite3 spatialite-bin libsqlite3-mod-spatialite
Paquete del Kit de Desarrollo Java (OpenJDK), asegurese que se usa la versión de Java 8.0 (y no la versión 11).
sudo apt install -y openjdk-8-jdk-headless default-jdk-headless && \
sudo update-java-alternatives --jre-headless --jre --set java-1.8.0-openjdk-amd64
java -version
Let's Encrypt stack,
sudo add-apt-repository ppa:certbot/certbot && \
sudo apt update -y ; sudo apt install python-certbot-nginx -y
Actualizar y limpiar sistema en general
sudo apt update
sudo apt -y dist-upgrade
sudo apt -y autoremove
sudo apt -y autoclean
Crear usuario dedicado
El usuario definido para estas tareas tendrá pertenecerá al grupo sudo, por lo que tendrá derechos administrativos.
sudo adduser geonode
sudo usermod -aG sudo geonode
su geonode
Establecimiento de Ambiente de Trabajo GeoNode
Creación de folder geonode
source /usr/share/virtualenvwrapper/virtualenvwrapper.sh
mkvirtualenv geonode
Guardar permanentemente el ambiente virtualenvwrapper,
cat << VENV >> ~/.bashrc

export WORKON_HOME=/home/geonode/.virtualenvs
source /usr/share/virtualenvwrapper/virtualenvwrapper.sh
VENV
Crear directorio base GeoNode,
sudo mkdir -p /opt/geonode/
sudo usermod -a -G www-data geonode
sudo chown -Rf geonode:www-data /opt/geonode/
sudo chmod -Rf 775 /opt/geonode/
Clonamos repositorio, Importante: Usaremos la rama estable 2.10.x
cd /opt
git clone https://github.com/GeoNode/geonode.git -b 2.10.x geonode

cd /opt/geonode
git checkout 2.10.x
pip install -r requirements.txt --upgrade --no-cache --no-cache-dir
pip install -e . --upgrade

pip install pygdal=="`gdal-config --version`.*"
cd $HOME
Base de Datos PostgreSQL - PostGIS
Agregar versión superior a los repositorios, v11.
sudo sh -c 'echo "deb http://apt.postgresql.org/pub/repos/apt/ `lsb_release -cs`-pgdg main" >> /etc/apt/sources.list.d/pgdg.list'
sudo wget --no-check-certificate --quiet -O - https://www.postgresql.org/media/keys/ACCC4CF8.asc | sudo apt-key add -

sudo apt update
sudo apt install -y postgresql-11 postgresql-11-postgis-2.5 postgresql-11-postgis-2.5-scripts postgresql-contrib-11 postgresql-client-11
Creación de bases de datos:
- geonode
- geonode_data
Usuario de base de datos
sudo -u postgres createuser -P geonode
Elija una contraseña y guárdela, para fines de ejemplo usaremos 'geonode'.
Crear base de datos,
sudo -u postgres createdb -O geonode geonode
sudo -u postgres createdb -O geonode geonode_data
Configurar base para extensión PostGIS,
sudo -u postgres psql -d geonode_data -c 'CREATE EXTENSION postgis;'
sudo -u postgres psql -d geonode_data -c 'GRANT ALL ON geometry_columns TO PUBLIC;'
sudo -u postgres psql -d geonode_data -c 'GRANT ALL ON spatial_ref_sys TO PUBLIC;'
sudo -u postgres psql -d geonode_data -c 'GRANT ALL PRIVILEGES ON ALL TABLES IN SCHEMA public TO geonode;'
Finalmente editar las políticas de acceso de usuario,
sudo nano /etc/postgresql/11/main/pg_hba.conf
Encuentra la línea peer y edítela para verse de la siguiente manera,
#local   all             all                                     peer
local   all             all                                     trust
Reiniciar postgresql,
sudo service postgresql restart
En caso de necesitar probar la conexión se puede ejecutar,
psql -U geonode geonode
\q
GeoServer
GeoServer es un componente básico para GeoNode y para ejecutarse de manera estable se usará Apache Tomcat 8 como contenedor Java Servlet, asegurese de estár usando Java 8
java -version

sudo wget http://www-us.apache.org/dist/tomcat/tomcat-8/v8.5.54/bin/apache-tomcat-8.5.54.tar.gz
sudo tar xzf apache-tomcat-8.5.54.tar.gz
sudo mv apache-tomcat-8.5.54 /usr/local/apache-tomcat8

sudo useradd -m -U -s /bin/false tomcat
sudo usermod -a -G www-data tomcat
sudo sed -i -e 's/xom-\*\.jar/xom-\*\.jar,bcprov\*\.jar/g' /usr/local/apache-tomcat8/conf/catalina.properties

export JAVA_HOME=$(readlink -f /usr/bin/java | sed "s:bin/java::")
echo 'JAVA_HOME='$JAVA_HOME | sudo tee -a /usr/local/apache-tomcat8/bin/setenv.sh

sudo usermod -a -G www-data tomcat

sudo sh -c 'chmod +x /usr/local/apache-tomcat8/bin/*.sh'
sudo chown -Rf tomcat:www-data /usr/local/apache-tomcat8
Crear un servicio para el inicio de tomcat,
sudo nano /etc/systemd/system/tomcat.service


[Unit]
Description=Tomcat 8.5 servlet container
After=network.target

[Service]
Type=forking

User=tomcat
Group=tomcat

Environment="JAVA_HOME=/usr/lib/jvm/default-java"
Environment="JAVA_OPTS=-Djava.security.egd=file:///dev/urandom"

Environment="CATALINA_BASE=/usr/local/apache-tomcat8"
Environment="CATALINA_HOME=/usr/local/apache-tomcat8"
Environment="CATALINA_PID=/usr/local/apache-tomcat8/temp/tomcat.pid"

ExecStart=/usr/local/apache-tomcat8/bin/startup.sh
ExecStop=/usr/local/apache-tomcat8/bin/shutdown.sh

[Install]
WantedBy=multi-user.target
Probar el servicio con,
sudo systemctl daemon-reload
sudo systemctl restart tomcat
sudo systemctl status tomcat.service
activarlo por default con,
sudo systemctl enable tomcat
Preparar directororio GeoServer data y logs,
sudo mkdir -p /opt/data
sudo chown -Rf geonode:www-data /opt/data
sudo chmod -Rf 775 /opt/data
sudo mkdir -p /opt/data/logs
sudo chown -Rf geonode:www-data /opt/data/logs
sudo chmod -Rf 775 /opt/data/logs

# Download and extract the default GEOSERVER_DATA_DIR
#GeoNode 2.10.x !> GeoServer 2.14.x
sudo wget --no-check-certificate https://build.geo-solutions.it/geonode/geoserver/latest/data-2.14.4.zip
sudo unzip -q data-2.14.4.zip -d /opt/data/

sudo mv /opt/data/data/ /opt/data/geoserver_data
sudo chown -Rf tomcat:www-data /opt/data/geoserver_data
sudo chmod -Rf 775 /opt/data/geoserver_data

sudo mkdir -p /opt/data/geoserver_logs
sudo chown -Rf tomcat:www-data /opt/data/geoserver_logs
sudo chmod -Rf 775 /opt/data/geoserver_logs

sudo mkdir -p /opt/data/gwc_cache_dir
sudo chown -Rf tomcat:www-data /opt/data/gwc_cache_dir
sudo chmod -Rf 775 /opt/data/gwc_cache_dir

# Download and install GeoServer
sudo wget --no-check-certificate https://build.geo-solutions.it/geonode/geoserver/latest/geoserver-2.14.4.war
sudo mv geoserver-2.14.4.war /usr/local/apache-tomcat8/webapps/geoserver.war
Configurar opciones del servelt java,
sudo sed -i -e "s/JAVA_OPTS=/#JAVA_OPTS=/g" /usr/local/apache-tomcat8/bin/setenv.sh

echo '
GEOSERVER_DATA_DIR="/opt/data/geoserver_data"
GEOSERVER_LOG_LOCATION="/opt/data/geoserver_logs/geoserver.log"
GEOWEBCACHE_CACHE_DIR="/opt/data/gwc_cache_dir"
GEOFENCE_DIR="$GEOSERVER_DATA_DIR/geofence"
TIMEZONE="UTC"

JAVA_OPTS="-server -Djava.awt.headless=true -Dorg.geotools.shapefile.datetime=true -XX:+UseParallelGC -XX:ParallelGCThreads=4 -Dfile.encoding=UTF8 -Duser.timezone=$TIMEZONE -Xms512m -Xmx4096m -Djavax.servlet.request.encoding=UTF-8 -Djavax.servlet.response.encoding=UTF-8 -DGEOSERVER_CSRF_DISABLED=true -DGEOSERVER_DATA_DIR=$GEOSERVER_DATA_DIR -Dgeofence.dir=$GEOFENCE_DIR -DGEOSERVER_LOG_LOCATION=$GEOSERVER_LOG_LOCATION -DGEOWEBCACHE_CACHE_DIR=$GEOWEBCACHE_CACHE_DIR"'| sudo tee -a /usr/local/apache-tomcat8/bin/setenv.sh
Reiniciar servidor para aplicar cambios,
sudo systemctl daemon-reload
sudo systemctl restart tomcat
sudo systemctl status tomcat.service
Revisar que no haya errores en los registros de inicio,
sudo tail -F -n 300 /opt/data/geoserver_logs/geoserver.log
Debería lucir algo como,
2019-05-31 10:06:34,281 INFO [geoserver.wps] - Found 89 bindable processes in Deprecated processes
2019-05-31 10:06:34,298 INFO [geoserver.wps] - Found 31 bindable processes in Vector processes
2019-05-31 10:06:34,307 INFO [geoserver.wps] - Found 48 bindable processes in Geometry processes
2019-05-31 10:06:34,307 INFO [geoserver.wps] - Found 1 bindable processes in PolygonLabelProcess
2019-05-31 10:06:34,311 INFO [geoserver.wps] - Blacklisting process ras:ConvolveCoverage as the input kernel of type class javax.media.jai.KernelJAI cannot be handled
2019-05-31 10:06:34,319 INFO [geoserver.wps] - Blacklisting process ras:RasterZonalStatistics2 as the input zones of type class java.lang.Object cannot be handled
2019-05-31 10:06:34,320 INFO [geoserver.wps] - Blacklisting process ras:RasterZonalStatistics2 as the input nodata of type class it.geosolutions.jaiext.range.Range cannot be handled
2019-05-31 10:06:34,320 INFO [geoserver.wps] - Blacklisting process ras:RasterZonalStatistics2 as the input rangeData of type class java.lang.Object cannot be handled
2019-05-31 10:06:34,320 INFO [geoserver.wps] - Blacklisting process ras:RasterZonalStatistics2 as the output zonal statistics of type interface java.util.List cannot be handled
2019-05-31 10:06:34,321 INFO [geoserver.wps] - Found 18 bindable processes in Raster processes
2019-05-31 10:06:34,917 INFO [ows.OWSHandlerMapping] - Mapped URL path [/TestWfsPost] onto handler 'wfsTestServlet'
2019-05-31 10:06:34,918 INFO [ows.OWSHandlerMapping] - Mapped URL path [/wfs/*] onto handler 'dispatcher'
2019-05-31 10:06:34,918 INFO [ows.OWSHandlerMapping] - Mapped URL path [/wfs] onto handler 'dispatcher'
2019-05-31 10:06:42,237 INFO [geoserver.security] - Start reloading user/groups for service named default
2019-05-31 10:06:42,241 INFO [geoserver.security] - Reloading user/groups successful for service named default
2019-05-31 10:06:42,357 WARN [auth.GeoFenceAuthenticationProvider] - INIT FROM CONFIG
Aplicamos los últimos cambios, y creamos
cd /opt/geonode
python manage.py makemigrations
python manage.py migrate
De ser así, entonces el servidor GeoServer debería estarse ejecutando en,
http://localhost:8080/geoserver/
Nota: En caso de errores o no existir el archivo de registros, revisar /usr/local/apache-tomcat8/logs/catalina.out
Servidor Web
Instalar y configurar NGINX
sudo apt install -y nginx uwsgi uwsgi-plugin-python
Servir GeoNode y GeoServer con NGINX
Creamos el archivo con la configuración deseada para /etc/uwsgi/apps-available/geonode.ini
sudo nano /etc/uwsgi/apps-available/geonode.ini

[uwsgi]
socket = 0.0.0.0:8000
uid = geonode
gid = www-data

plugins = python
virtualenv = /home/geonode/.virtualenvs/geonode
env = DEBUG=False
env = DJANGO_SETTINGS_MODULE=geonode.settings
env = SECRET_KEY='RanD0m%3cr3tK3y'
env = SITE_HOST_NAME=localhost
env = SITEURL=http://localhost/
env = LOCKDOWN_GEONODE=False
env = SESSION_EXPIRED_CONTROL_ENABLED=True
env = FORCE_SCRIPT_NAME=
env = EMAIL_ENABLE=False
env = DJANGO_EMAIL_HOST_USER=
env = DJANGO_EMAIL_HOST_PASSWORD=
env = DJANGO_EMAIL_HOST=localhost
env = DJANGO_EMAIL_PORT=25
env = DJANGO_EMAIL_USE_TLS=False
env = DEFAULT_FROM_EMAIL=GeoNode <no-reply@localhost>
env = MONITORING_ENABLED=True
env = GEOSERVER_PUBLIC_HOST=localhost
env = GEOSERVER_PUBLIC_PORT=
env = GEOSERVER_ADMIN_PASSWORD=geoserver
env = GEOSERVER_LOCATION=http://localhost/geoserver/
env = GEOSERVER_PUBLIC_LOCATION=http://localhost/geoserver/
env = GEOSERVER_WEB_UI_LOCATION=http://localhost/geoserver/
env = RESOURCE_PUBLISHING=False
env = ADMIN_MODERATE_UPLOADS=False
env = GROUP_PRIVATE_RESOURCES=False
env = GROUP_MANDATORY_RESOURCES=False
env = OGC_REQUEST_TIMEOUT=60
env = OGC_REQUEST_MAX_RETRIES=3
env = OGC_REQUEST_POOL_MAXSIZE=100
env = OGC_REQUEST_POOL_CONNECTIONS=100
env = EXIF_ENABLED=True
env = CREATE_LAYER=False
env = FAVORITE_ENABLED=True

chdir = /opt/geonode
module = geonode.wsgi:application

processes = 4
threads = 2
enable-threads = true
master = true

# logging
# path to where uwsgi logs will be saved
logto = /opt/data/logs/geonode.log
daemonize = /opt/data/logs/geonode.log
touch-reload = /opt/geonode/geonode/wsgi.py
buffer-size = 32768
max-requests = 500
harakiri = 300 # respawn processes taking more than 5 minutes (300 seconds)
max-requests = 500 # respawn processes after serving 5000 requests
# limit-as = 1024 # avoid Errno 12 cannot allocate memory
harakiri-verbose = true
vacuum = true
thunder-lock = true
a continuación habilitamos la configuración UWSGI y reiniciamos el servicio para que se activen los cambios,
sudo ln -s /etc/uwsgi/apps-available/geonode.ini /etc/uwsgi/apps-enabled/geonode.ini
sudo service uwsgi restart
Respaldamos la configuración original y configuramos el servidor nginx,
sudo cp /etc/nginx/nginx.conf /etc/nginx/nginx.conf.orig

echo "" |sudo tee /etc/nginx/nginx.conf
sudo nano /etc/nginx/nginx.conf
#Copiar y pegar

user www-data;
worker_processes auto;
pid /run/nginx.pid;
include /etc/nginx/modules-enabled/*.conf;

events {
  worker_connections 768;
  # multi_accept on;
}

http {
  ##
  # Basic Settings
  ##

  sendfile on;
  tcp_nopush on;
  tcp_nodelay on;
  keepalive_timeout 65;
  types_hash_max_size 2048;
  # server_tokens off;

  # server_names_hash_bucket_size 64;
  # server_name_in_redirect off;

  include /etc/nginx/mime.types;
  default_type application/octet-stream;

  ##
  # SSL Settings
  ##

  ssl_protocols TLSv1.3 TLSv1.2; # Dropping SSLv3, ref: POODLE
  ssl_prefer_server_ciphers on;

  ##
  # Logging Settings
  ##

  access_log /var/log/nginx/access.log;
  error_log /var/log/nginx/error.log;

  ##
  # Gzip Settings
  ##

  gzip on;
  gzip_vary on;
  gzip_proxied any;
  gzip_http_version 1.1;
  gzip_disable "MSIE [1-6]\.";
  gzip_buffers 16 8k;
  gzip_min_length 1100;
  gzip_comp_level 6;
  gzip_types video/mp4 text/plain application/javascript application/x-javascript text/javascript text/xml text/css image/jpeg;

  ##
  # Virtual Host Configs
  ##

  include /etc/nginx/conf.d/*.conf;
  include /etc/nginx/sites-enabled/*;
}
Removemos sitio predefinido y creamos el archivo de configuración de NGINX,
sudo rm /etc/nginx/sites-enabled/default

sudo nano /etc/nginx/sites-available/geonode

uwsgi_intercept_errors on;

upstream geoserver_proxy {
  server localhost:8080;
}

# Expires map
map $sent_http_content_type $expires {
  default                    off;
  text/html                  epoch;
  text/css                   max;
  application/javascript     max;
  ~image/                    max;
}

server {
  listen 80 default_server;
  listen [::]:80 default_server;

  root /var/www/html;
  index index.html index.htm index.nginx-debian.html;

  server_name _;

  charset utf-8;

  etag on;
  expires $expires;
  proxy_read_timeout 600s;
  # set client body size to 2M #
  client_max_body_size 50000M;

  location / {
    etag off;
    uwsgi_pass 127.0.0.1:8000;
    uwsgi_read_timeout 600s;
    include uwsgi_params;
  }

  location /static/ {
    alias /opt/geonode/geonode/static_root/;
  }

  location /uploaded/ {
    alias /opt/geonode/geonode/uploaded/;
  }

  location /geoserver {
    proxy_pass http://geoserver_proxy;
    include proxy_params;
  }
}
Revisamos que no haya errores en la sintaxis,
sudo nginx -t
Habilitamos sitio y reiniciamos servicios,
sudo ln -s /etc/nginx/sites-available/geonode /etc/nginx/sites-enabled/geonode
sudo systemctl restart tomcat
sudo service nginx restart
Actualizamos la información estática de GeoNode,
workon geonode
cd /opt/geonode
python manage.py collectstatic --no-input
Actualizamos la configuración OAuth2 de GeoNode y GeoServer,
workon geonode
cd /opt/geonode

# Solo ejecutarse una ocasión al inicio de la configuración
sudo cp package/support/geonode.binary /usr/bin/geonode
sudo cp package/support/geonode.updateip /usr/bin/geonode_updateip
sudo chmod +x /usr/bin/geonode
sudo chmod +x /usr/bin/geonode_updateip
pip install -e git+https://github.com/justquick/django-activity-stream.git#egg=django-activity-stream

# Update the GeoNode ip or hostname
sudo PYTHONWARNINGS=ignore VIRTUAL_ENV=$VIRTUAL_ENV DJANGO_SETTINGS_MODULE=geonode.settings GEONODE_ETC=/opt/geonode GEOSERVER_DATA_DIR=/opt/data/geoserver_data TOMCAT_SERVICE="service tomcat" APACHE_SERVICE="service nginx" geonode_updateip -p localhost
Configurar para usar la base de datos PostgreSQL
Crear archivo de configuraciones locales desde un archivo de ejemplo,
workon geonode
cd /opt/geonode

cp geonode/local_settings.py.geoserver.sample geonode/local_settings.py
Cambie el password "genode_pass" por el suyo,
sudo sed -i -e "s/'PASSWORD': 'geonode',/'PASSWORD': 'geonode_pass',/g" geonode/local_settings.py
Se detiene tomcat y se inicia GeoNode
sudo systemctl stop tomcat

DJANGO_SETTINGS_MODULE=geonode.local_settings paver reset
DJANGO_SETTINGS_MODULE=geonode.local_settings paver setup
DJANGO_SETTINGS_MODULE=geonode.local_settings paver sync
DJANGO_SETTINGS_MODULE=geonode.local_settings python manage.py collectstatic --noinput
Actualizamos la configuración UWSGI,
sudo sed -i "s|geonode.settings|geonode.local_settings|g" /etc/uwsgi/apps-enabled/geonode.ini
Reiniciamos servicio uwsg para aplicar actualización ,
sudo service uwsgi restart

sudo PYTHONWARNINGS=ignore VIRTUAL_ENV=$VIRTUAL_ENV DJANGO_SETTINGS_MODULE=geonode.local_settings GEONODE_ETC=/opt/geonode GEOSERVER_DATA_DIR=/opt/data/geoserver_data TOMCAT_SERVICE="service tomcat" APACHE_SERVICE="service nginx" geonode_updateip -p localhost
Con estos cambios debería estar diponible,
GeoNode en http://localhost/
Para inicio de sesión puede acceder con el usuario y contraseña: admin
GeoServer en http://localhost/geoserver/
Para inicio de sesión puede acceder con el usuario admin y contraseña: geoserver
Configurar GeoNode y GeoServer para dominio propio
-
NGINX
Entrar a la configuración del dominio y actualizar la directiva, 'server_name' y reiniciar el servicio,
sudo nano /etc/nginx/sites-enabled/geonode server_name ejemplo.com www.ejemplo.com; sudo service nginx restart -
UWSGI
Cambiar localhost por el dominio a utilizar en todo el documento y reiniciar el servicio,sudo sed -i "s|localhost|www.ejemplo.com|g" /etc/uwsgi/apps-enabled/geonode.ini sudo service uwsgi restart -
Actualizar OAuth2,
workon geonode cd /opt/geonode # Update the GeoNode ip or hostname sudo PYTHONWARNINGS=ignore VIRTUAL_ENV=$VIRTUAL_ENV DJANGO_SETTINGS_MODULE=geonode.local_settings GEONODE_ETC=/opt/geonode GEOSERVER_DATA_DIR=/opt/data/geoserver_data TOMCAT_SERVICE="service tomcat" APACHE_SERVICE="service nginx" geonode_updateip -l localhost -p www.ejemplo.com -
Actualizar los enlaces existentes en GeoNode para el nuevo hostname,
workon geonode
cd /opt/geonode

# Update the GeoNode ip or hostname
DJANGO_SETTINGS_MODULE=geonode.local_settings python manage.py migrate_baseurl --source-address=http://localhost --target-address=http://www.example.org
Asegurar por medio de HTTPS
Creamos el certificado,
sudo certbot --nginx -d example.org -d www.example.org
Opcionalmente puede aceptar la redirección automática por parte de nginx seleccionando la opción 2,
Please choose whether or not to redirect HTTP traffic to HTTPS, removing HTTP access.
- - - - - - - - - - - - - - - - - - - - - - - - - - - - - - - - - - - - - - - -
1: No redirect - Make no further changes to the webserver configuration.
2: Redirect - Make all requests redirect to secure HTTPS access. Choose this for
new sites, or if you're confident your site works on HTTPS. You can undo this
change by editing your web server's configuration.
- - - - - - - - - - - - - - - - - - - - - - - - - - - - - - - - - - - - - - - -
Select the appropriate number [1-2] then [enter] (press 'c' to cancel):
Continuamos actualizando el redireccionamiento SSL desde la interfaz grafica,
-
Actualizar los URIs de redireccionamiento OAuth2 de GeoNode
Desde el dashboard vaya a, Administración › Django/GeoNode OAuth Toolkit › Applications › GeoServer
Agregue los Redirecs URIs:
https://ejemplo.com/geoserver/
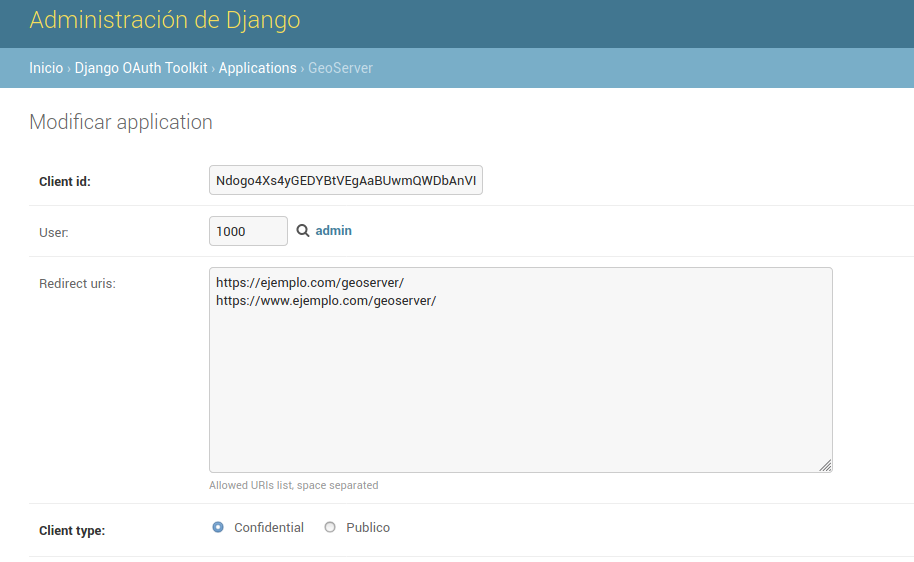
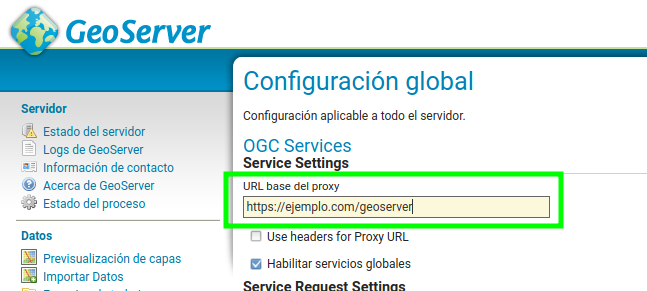
- Actualice el URL base del proxy, del GeoServer (https://www.ejemplo.com/geoserver), ver usuario y contraseña arriba
En la sección "Settings > Global" Proxy Base URL
https://www.ejemplo.com/geoserver
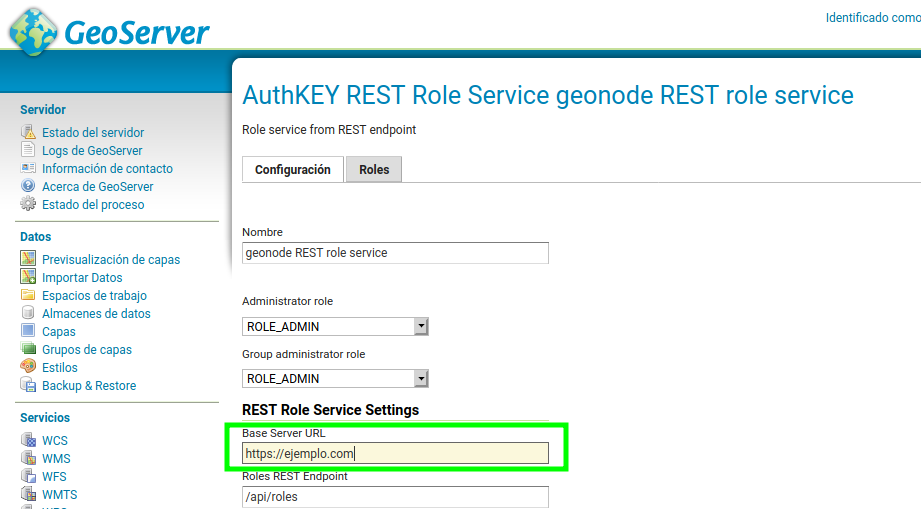
- Actualizar el enlace base del GeoServer,
Desde la interfaz de administración, vaya a
Seguridad > Usuarios, Grupos, Roles > geonode REST role service
Base Server URL
https://www.ejemplo.com
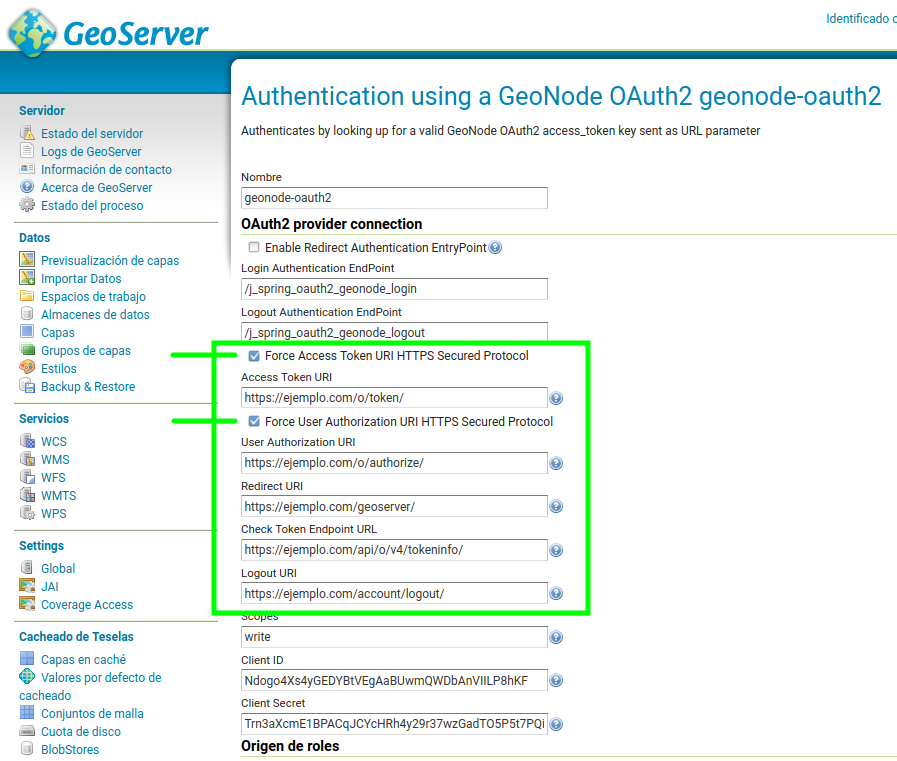
- Actualizar los parametros OAuth2 de GeoServer.
Desde la interfaz de administración, vaya a
Seguridad > Identificación > Filtros de identificación > geonode-oauth2
-
Force Access Token URI HTTPS Secure Protocol
Access Token URI
https://www.ejemplo.com/o/token/ -
Force User Authorization URI HTTPS Secured Protocol
User Authorization URI
https://www.ejemplo.com/o/authorize/Redirect URI
https://www.ejemplo.com/o/geoserver/CheckToken Endpoint URL
https://www.ejemplo.com/api/o/v4/tokeninfo/Logout URI
https://www.ejemplo.com/account/logout/
-
Actualizar la configuración UWSGI,
Reemplazar http a https en /etc/uwsgi/apps-enabled/geonode.inised -i "s|http|https|g" /etc/uwsgi/apps-enabled/geonode.iniAgregar variables adicionales para SSL, solo habilite HSTS cuando esté seguro que asignará dicho dominio a largo plazo,
env = SECURE_SSL_REDIRECT=True
#Evitar su uso en ambientes de desarrollo
#env = SECURE_HSTS_INCLUDE_SUBDOMAINS=True
env = AVATAR_GRAVATAR_SSL=True
Reiniciar servicio,
sudo service uwsgi restart
Anexos
Cambio de contraseña GeoServer
En el menú lateral búsque la sección Seguridad > Usuarios, Grupos, Roles bajo la pestaña Users/Groups.
Editar usuario admin, modifique su contraseña y guarde los cambios.
© Copyright 2017-2019, Open Source Geospatial Foundation, CC-SA